
Files (3)
Choose the needed variant and slice it; source file size is not printable volume.
Use the slicer's filament total; STL/3MF byte size is not a cost input.
Slice with the recommended material, infill, orientation, and supports.
| STL file | Role | Source size | PETG / ASA 20% | PETG / ASA 25% | 100% solid | Recommendation |
|---|---|---|---|---|---|---|
| V2.stl | Accessory piece | 8.5 KB STL | Slice file | Slice file | Slice file | Small functional file: print slowly; consider 80–100% infill for durability. |
| V2_slim.stl | Accessory piece | 8.1 KB STL | Slice file | Slice file | Slice file | Small functional file: print slowly; consider 80–100% infill for durability. |
| V3_full_with_holes.stl | Accessory piece | 15.5 KB STL | Slice file | Slice file | Slice file | Small functional file: print slowly; consider 80–100% infill for durability. |
Saved setup guidance is used for material, infill, support, and per-file recommendation text; editable numbers are planning estimates only.
Corvette C5 1997 - 2004 Knee Bolster Repair

Shared by
3DPrintedCarPartDescription
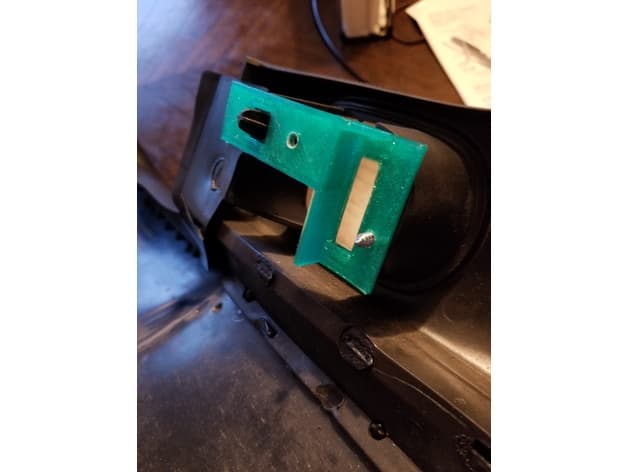
This is a part to fix the commonly broken plastic piece behind the trunk button. I made this cuz I didn't want to spend $40 on this piece here zip-corvette.com/97-04-instrument-panel-knee-pad-repair-kit.html (or even buy a whole new knee bolster!) This is also the first 3d model I've ever made! V2 Installation: For installation you will want to install 1 screw / bolt of whatever size you want in the spot shown in the pictures. For me this worked perfectly fine to keep it in place, and I did not bother adding screws on the other side like the $40 kit does. Just drill the hole yourself, you're gonna have to drill through the original plastic anyways so I didn't bother adding a pre-made hole onto the print. Then when you screw it to the car it will be a little bit of a tight fit with the original screw but it fits. Note: I tried putting a second screw on the other side but it got in the way of some plastic behind it. The thing works fine with just the 1 screw attached to the side near the clip though, and if you want, you could even do 2 screws! If you want to screw in the other side also then use V3. V3 Installation: I did not test V3 personally, I installed V2 in my car and it works fine for me. V3 I just added the long other side piece so u can now attach to both sides if you would like and added 2 3mm holes you can use as drill spots. I haven't tested so I can't guarentee the new plastic piece and drill hole will fit properly but if it doesn't then u can just cut the little arm off and bam now you have a V2. And if you want a V2_slim just cut off the square hole that the peg goes through. Wow. **Might need to scale it before you print. Correct size for V2 is 7.2cm X 4.4cm X 1.2cm.
Compatible Cars
Originally published on thingiverse.com by Jeff Grusky (JeffGrusky) · License: CC BY
Share whether this print actually fits a real car. Installed photos and material notes make the catalog more trustworthy.
Related Parts
Most specific car + model + year + category matches first, with popular parts mixed in.
C4 Corvette Seat Back Bezel
License: CC BY
View & download STL files
Seat Belt Clip
License: CC BY
View & download STL files
C7 Corvette Seat Belt
License: CC BY
View & download STL files
C4 Corvette Cargo Shade Clip
License: CC BY
View & download STL files
C4 Corvette Center Cap Holder Tabs
License: CC BY
View & download STL files
BMW X5 E70 Center Console Blind Plate
BMW
License: CC BY
View & download STL files
