
Files (2)
Slice the required model files; source file size is not printable volume.
Use the slicer's filament total; STL/3MF byte size is not a cost input.
Slice with the recommended material, infill, orientation, and supports.
| STL file | Role | Source size | PETG / ASA 20% | PETG / ASA 25% | 100% solid | Recommendation |
|---|---|---|---|---|---|---|
| Holder_TomTom_Nissan.stl | Mount / bracket | 79.2 KB STL | Slice file | Slice file | Slice file | Ensure a strong adhesion to the print bed to avoid warping. |
| Houder_cover_TomTom_Nissan.stl | Cover / cap | 31.2 KB STL | Slice file | Slice file | Slice file | Use PETG / ASA; check sealing faces and verify in slicer. |
Saved setup guidance is used for material, infill, support, and per-file recommendation text; editable numbers are planning estimates only.
Navigation system Car holder for Nissan NV200

Shared by
3DPrintedCarPartDescription
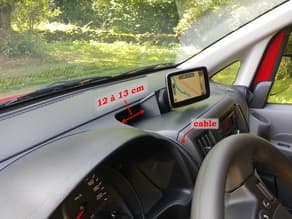
=============================================================== Navigation system Car holder for Nissan NV200 Usually an external navigation system is supplied with a suction cup to place it against the windshield. However, I prefer to place the system on the dashboard and that is why I have designed a special holder for the Nissan NV200. I made it in such a way that it fits exactly into the opening on top of the dashboard and the connecting cable can be led almost unobtrusively to the power plug. The holder is suitable for the TomTom Go5200 but other systems will also fit if the suction cup diameter is not larger than 60 mm. Mounting 1) Make the opening of the suction cup as large as possible by turning the ring. 2) Place the suction cup in the narrow opening on top of the holder and then tighten the fixing ring at the suction cup. 3) Place a strip of double-sided tape on the back of the holder (see drawing). 4) Feed the cable through the 4 openings, provided for this. 5) Remove the second adhesive layer from the tape and place the holder in the opening on the dashboard. (see drawing) 6) Route the cable along the edge of the dashboard (see photo) to the power connector. Cable can be secured in some places with, for example, “Vehicle Double Sided Sticker Car Adhesive Acrylic Foam Tape” available via ebay. 7) Finally place the cover on top of the holder.
Compatible Cars
Originally published on thingiverse.com by Joseph Luijten (DutchSwede) · License: CC0
Share whether this print actually fits a real car. Installed photos and material notes make the catalog more trustworthy.
Related Parts
Finding specific fitment/category matches first.

