
Files (2)
Choose the needed variant and slice it; source file size is not printable volume.
Use the slicer's filament total; STL/3MF byte size is not a cost input.
Slice with the recommended material, infill, orientation, and supports.
| STL file | Role | Source size | PETG / ASA 20% | PETG / ASA 25% | 100% solid | Recommendation |
|---|---|---|---|---|---|---|
| Crank_seal_tool_v2_short.stl | Printable file | 918.1 KB STL | Slice file | Slice file | Slice file | Ensure a clean and dry print bed for optimal adhesion |
| crank_seal_V1.stl | Printable file | 718.1 KB STL | Slice file | Slice file | Slice file | Ensure a clean and dry print bed for optimal adhesion |
Saved setup guidance is used for material, infill, support, and per-file recommendation text; editable numbers are planning estimates only.
Ford 1.5L & 1.6L Crankshaft seal Tool

Shared by
3DPrintedCarPartDescription
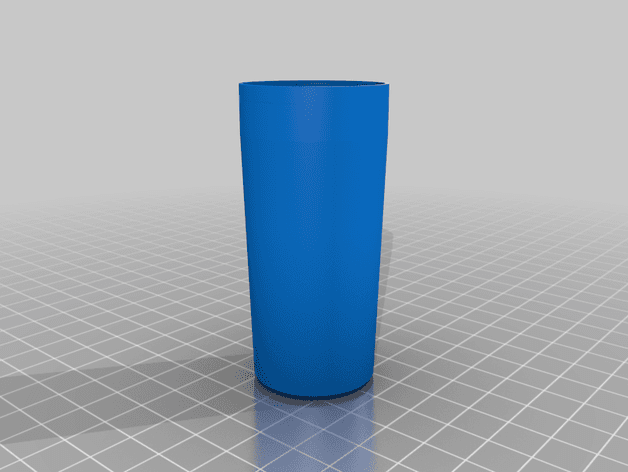
If you are replacing the front crankshaft seal on any 1.6 or 1.5 Ford engine (Escape/Kuga/Fusion/Mondeo/Fiesta ST) you will find that when sliding the seal over the crank's long nose, the oil pump drive will catch your seal and flip over the inner lip causing an oil leak worse than before you took it apart. This tool isn't a driver, it's a guide that loads the seal's lip and allows you to transfer it over that oil pump drive. See pics for a visual explanation and suggested print settings. USAGE: Note: If you are unfamiliar with this engine, make sure to understand the mechanical timing setup procedure and the implications of not aligning it prior to removing the crankshaft's bolt (NO KEYWAY FOR ALIGNMENT). You will need the Rotunda Crank holding pin, Camshaft VCT lock bracket, and Harmonic balancer CKP sensor alignment tool. Impossible without these tools, if the mechanical timing is out even a small amount, you will get a cam/crank correlation DTC. - Remove old front crankshaft seal 1. (If seal has a spring) Tightly pack inside of new seal with a temperature sensitive grease (trans assembly lube) 2. lightly grease crankshaft oil pump drive and the entire outside surface of this tool. 3. Starting at the small end of the tool, gently slide the new seal down to the large end. The seal lip has now folded back and given you a larger Inner Diameter to work with 4. Slide the seal/tool assembly down the crank until it touches the front of the engine (oil pump). 5. USING ONLY YOUR HANDS evenly push the seal, transferring it from the tool to the crankshaft. If it goes sideways, pull it back off and reset making sure to verify that the seal's inner spring hasn't dislodged (if equipped). 6. The seal is now positioned on the crank and past the lip it would normally catch on. Pushing with your hands, insert the seal into the oil pump housing until the outer edge of the seal is flush or slightly counter-sunk. Unlike most seals, this isn't hard to by hand. - Begin timing the engine THEN installing the crank pulley, making sure to use a new crank bolt (yield design). There are 2.stl files included but you only need one of them. I've been using V1 for a year successfully. I've just iterated on the design, V2 is a bit tougher to print and more fragile but fits closer to the oil pump making the transfer easier yet.
Compatible Cars
Originally published on thingiverse.com by Binary mein (binarymein) · License: CC BY
Share whether this print actually fits a real car. Installed photos and material notes make the catalog more trustworthy.
Related Parts
Most specific car + model + year + category matches first, with popular parts mixed in.
ford diesel fuel filter socket
Ford
License: CC BY-NC
View STL source
Ford F150 Drain Plug Tool
License: CC BY
View & download STL files
Mustang GT 350 Spoiler Tool
License: CC BY
View & download STL files
Ford F150 F250 F350 Rear Seat Latch Puller
License: CC BY-NC
View STL source
Model T Compression Tester Adapter M14 to 1/2 NPT
License: CC BY
View & download STL files
BMW X5 E70 Center Console Blind Plate
BMW
License: CC BY
View & download STL files
