
Files (1)
Slice the required model files; source file size is not printable volume.
Use the slicer's filament total; STL/3MF byte size is not a cost input.
Slice with the recommended material, infill, orientation, and supports.
| STL file | Role | Source size | PETG / ASA 20% | PETG / ASA 25% | 100% solid | Recommendation |
|---|---|---|---|---|---|---|
| Dash_cam_mounting_template.stl | Mount / bracket | 3.2 KB STL | Slice file | Slice file | Slice file | Small functional file: print slowly; consider 80–100% infill for durability. |
Saved setup guidance is used for material, infill, support, and per-file recommendation text; editable numbers are planning estimates only.
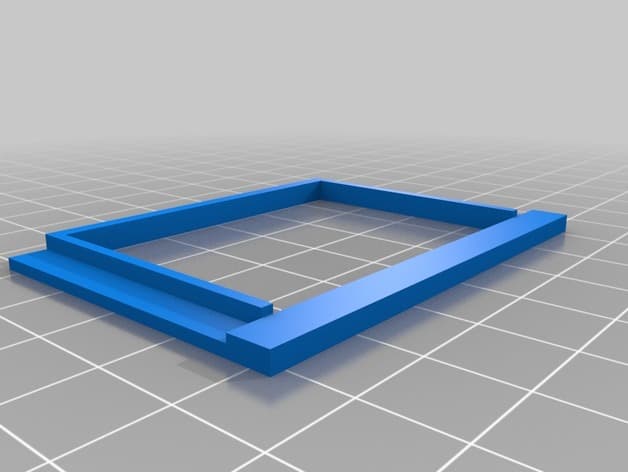
A118/B40 Dash Cam Mounting Tool

Shared by
3DPrintedCarPartDescription
Update 10/7/17 I added a couple tips for dash cam use below. This is a tool to help locate the pressure sensitive adhesive mounting plate (or strips) on the windshield for an A118 or B40 dash camera. For my cars, I used 3M Command Strips (a velcro-like fastener) rather than the mounting plate furnished with the camera because it is easier to make minor adjustments after the initial mounting. Quick steps to use the tool: 1. Attach the tool around the mounting face of the camera. 2. Turn on the cam and use the display to find the best location for mounting. 3. While holding the cam in the desired location, tape the tool to the glass and remove the camera. 4. Affix the mounting plate or strips to the glass in the appropriate position within the tool frame with the pressure sensitive adhesive. 5. Remove the tool frame from the glass and mount camera. Using the tool: It is a good idea to clean the glass with alcohol or other solvent in the area where the camera will be mounted to get the best adhesion. Place the tool around the window-mounting-surface of the camera (see photos) and attach a couple pieces of tape (masking tape is preferable) to the flanges on the tool at the sides of the camera. Turn on the camera and, using the display, find the preferred mounting location on the glass. While the camera and tool are held in-place, press the pieces of tape against the glass and remove the camera from the frame, leaving the tool attached to the window glass. Now, locate the mounting plate or command strips in the proper position within the frame of the tool and attach the adhesive to the glass. Remove the tool when the mounting device(s) are attached and make sure the adhesive is firmly pressed onto the glass. FWIW, I've found that the 3M strips hold the camera firmly through summer temperatures and driving on rough roads. A couple things I've found about dash cam use, YMMV: 1. Probably most low priced dash cams have relatively crappy exposure systems, that can be tricked into underexposing the portion of the frame that you are really interested in, i.e. the traffic in front of you. For a lens as wide as is typically used in this camera (170 deg), this is a fairly narrow horizontal band, about a third of the vertical frame height. If you set the camera, so that this band is in the lower part of the frame, then they sky above the horizon occupies a major portion of the frame. On very cloudy days, under certain conditions, the cloudy sky dominates the exposure system and the traffic band can be grossly underexposed to the point where it can affect the usability of the image. An easy fix to reduce the chance of this happening is to rotate the lens downward so the traffic band is in the middle of the frame This results in the dashboard and hood of the car occupying the bottom third of the frame, but the traffic zone will not be overwhelmed by the variable sky brightness, and you will have better video most of the time. 2. 1080 video is a big selling factor for these cameras, but it's worth trying 720 instead to see if it meets your needs. A few things that recording with 720 provides are: - More data on the memory card, twice the amount of recording time. - Lower processor load and less heating (think extreme summer). - Longer life of the memory card. Flash memory has a limited number of read/write cycles. - The lower resolution probably won't let you read license plates off the video, but 1080 might not either, most of the time. - Unless you are making a feature film, The 720 record will likely be sufficient for telling the story of unexpected events that unfold in front of you.
Compatible Cars
This part is marked as universal-fit. Confirm dimensions, mounting points, and clearances on your vehicle before printing.
Originally published on thingiverse.com by Doug H (DougInAZ) · License: CC BY
Share whether this print actually fits a real car. Installed photos and material notes make the catalog more trustworthy.
Related Parts
Most specific car + model + year + category matches first, with popular parts mixed in.
Threaded Oil Funnel
License: CC BY
View & download STL files
Drill Shifter
License: CC0
View & download STL files
Hyundai Brake Piston Tool
Hyundai
License: CC BY-NC
View STL source
ford diesel fuel filter socket
Ford
License: CC BY-NC
View STL source
1998 Honda CRV Automatic AWD Passenger Side Transmission Output Shaft Seal Guide
License: CC BY
View & download STL files
BMW X5 E70 Center Console Blind Plate
BMW
License: CC BY
View & download STL files
