Files (1)
Reference shelf
Recommended filament for this print
Product references matched to the published material guidance. Confirm diameter, heat resistance, colour, and printer compatibility.
| Referenced item | What to verify | Price & availability |
|---|---|---|
| PETG filamentAmazon · Affiliate link | Amazon product page for 1.75 mm PETG; confirm colour, spool size, print temperature, seller, and delivery region. | Check price at Amazon |
| ASA filamentAmazon · Affiliate link | Amazon product page for 1.75 mm ASA; use an enclosure and suitable ventilation, and confirm seller and regional availability. | Check price at Amazon |
Affiliate disclosure: if you buy through an eligible link, 3DPrintedCarPart may earn a commission at no extra cost to you. As an Amazon Associate I earn from qualifying purchases. Confirm product specifications, compatibility, seller terms, and vehicle safety before ordering or using anything. Amazon may redirect you to a nearby supported store; otherwise the original Amazon.com page remains available.
Nut & Washer Retainer for modified Cadillac crossbar kit for a Chevy Bolt Premier
License & use
The file license permits commercial reuse, subject to any applicable attribution or share-alike terms. License status does not verify vehicle fitment, OEM rights, design patents, or safety.
Shared by
Eric Halpern (elhalpern)Description
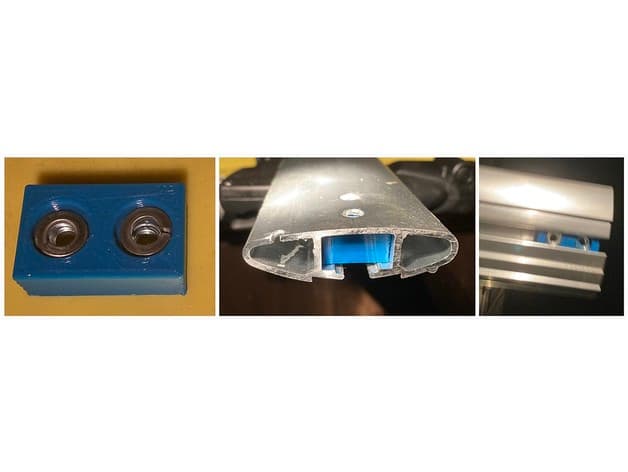
Thanks to all those that came before me on the Cadillac crossbars for the Bolt Premier roof rails. This part is also described in the ChevyBolt.Org at this URL: https://www.chevybolt.org/threads/crossbars-for-premier-trim-roof-rails.5441/page-4#post-396066 I paid $233 with shipping from a known GM parts distributor and was concerned about the accuracy of cutting the rails and the crossbar compatibility with Thule fork mount rails. After opening the box from GM I verified that the crossbars do in fact need to be cut, and noticed that the four black mounts are each unique and labeled LF, RF, LR, & RR. I was also concerned that the crossbars themselves might have a mitered cut and would effect how the rack mounted. Fortunately, the end cuts are not mitered in any significant way. I chose just to take the excess off of one end. The bars are arc'd and curved upward (convex) and taking the extra off one end is not an issue. I used an 80 tooth blade on my $100 Ryobi chop saw and did not find it necessary to clamp them in place for cutting. I've cut aluminum with various chop saws in the past and although they're made for wood, aluminum is fairly safe if you're careful. * use either a face shield like that for wood lathe work, or a combination of safety glasses, a covid-style mask, and a baseball cap. Aluminum flakes get everywhere and you want to protect yourself from the chips that fly. Also, take your time and cut slowly, especially if you use a blade with less than 60 teeth. Slow ifs Good! * the front and rear crossbars are different lengths!!! - I took my time and did very precise measurements and took one large cut, placed the bars back on the car with the brackets sitting tight up against their final location on one side, and propped up side and its mounting bracket, then measured again for the final cut. When I was done I saved all the pieces, measured the thickness of the saw blade, and determined exactly what I removed from each crossbar. So here's what I took off of each: * removed 89.0mm from the front bar * removed 82.7mm from the rear bar * It's better to remove too little and have to make another cut. My final cut on the rear bar was half a blade width and both crossbars fit perfect. * Once the bars were perfectly cut I placed the bars with their end brackets back on the roof at their exact mounting locations and sight them through their mounting holes on both sides of the car. With the bars sitting snugly in place I broke the last inch off a pencil and used sharp pencil to trace the mounting holes through the two brackets on the ends I trimmed. Then used a center punch to locate the drill bit precisely. * I bought four 6mm Nyloc nuts, and four "cut" (split lock washers) * I used a smaller pilot bit to more accurately locate the initial hole in the center and then use a bit that was ever-so-slight larger than the I.D. of the split lock washer. This gave me a little slop, but still made sure the lock washer would compress and do its job. * I solved the problem of the holding the Nyloc washers in place by creating a 3D printed block that hods the 6mm nuts and the 6mm lock washer in place. This worked great and I just slid them into the aero-shaped crossbar extrusion. Aside from holder the nuts and washers in place, this keeps the nuts from rotating during assemby. * The above nut/washer holder is a free download at: https://www.thingiverse.com/thing:4606945 This 3D printed block was perfect. It held the nuts and plit washers in place during assembly and allowed me to use the original screws that came with the Cadillac bar kit and gave me confidence that these screws will never come loose. * I also took the time to scribe the "weep" hole that is designed into the mounting bracket and while I was drilling the new 6mm holes, i use the small pilot bit to notch the end of the bars to keep the tiny hole open and free flowing in case there was dirt build up in the future. * The Thule Fork Mount rail I used was a "569 Sprint T" style. It was free from a friend. It had to be loaded in before the mounting brackets are attached. The Cadillac solution for the Bolt is the sleekest most aero design. If I used off-the-shelf (no-mod required) Thule kit then the 569 Sprint rail would be removable, but the crossbars would be stacked on the bracket and less aerodynamic. If I want to remove the fork mount rail I can simply un-screw the three cam levers completely and let the three remaining screw studs float in the crossbars, or possibly 3D print a simple bracket that holes them off to one side and provides a smooth cover to close the open channel and keeps them from rattling around while driving. The Thule circuit is another alternative, but the 569 Sprint T was free to me.
Compatible Vehicles
Originally published on thingiverse.com by Eric Halpern (elhalpern) · License: CC BY
Browse categories
Browse other part families
Jump to interior, exterior, accessories, dashboard, mechanical, or tools hubs when you need a different kind of replacement part.
Share whether this print actually fits a real car. Installed photos and material notes make the catalog more trustworthy.
Ask the community about this part
Start a fitment, printing, or design discussion with this part already attached.
Related Parts
Most specific car + model + year + category matches first, with popular parts mixed in.